
This tutorial is going to show you how to setup a obfs4proxy server to forward traffic from the internet to your openvpn service running on a server. As OpenVPN traffic is easily identifiable, it may be useful to obfuscate it. Please note that this does use a decent amount of CPU usage so if you are running it off a router or low-end device, please monitor your CPU usage.
I’m using Ubuntu 18.04 for this tutorial with the scripts running as nobody: nogroup. If you are using a RedHat based distro, it uses nobody:nobody. First, you need to have an OpenVPN server setup using TCP mode, note that the default is UDP. For this tutorial, I’ll assuming OpenVPN is listening on 4444. The obfsproxy will be listening on port 5555 and forwarding traffic to the OpenVPN server.
For this tutorial, I’ll be using the obfs4proxy binary and pluggable transport adapter python scripts.
I’m going to setup everything in /etc/openvpn/pluggabletransportadapter/, you can edit things as you see fit.
On the server side, $ cd /etc/openvpn $ sudo git clone https://github.com/twisteroidambassador/pluggabletransportadapter Next, you get obfs4 binary. You can either grab it from here Yawning Obfs4 or I have a Linux binary snapshot here. $ cd /etc/openvpn/pluggabletransportadapter/ $ sudo chown -R nobody:nogroup /etc/openvpn/pluggabletransportadapter/ $ wget "https://github.com/mosin/obfs4/releases/download/obfs4proxy-0.0.8-dev/obfs4proxy" $ chmod u+x /etc/openvpn/pluggabletransportadapter/obfs4proxy
Then we are going to: $ edit standalone_server_config.ini edit the forward line, in the common section from: forward = 127.0.0.1:7000 to forward = 127.0.0.1:4444 where 4444 is the port openvpn is listening on.
and the transports lines: [transports] obfs4 = 127.0.0.1:7900 to whatever you want your obfs4proxy to the IP and port your OpenVPN server is listening on, for this example I’m changing it to 5555. I’m also commenting out the obfs3 example.
Update the 1.1.1.1 address to match your OpenVPN local line of your configuration file. obfs4 = 1.1.1.1:5555 and delete/comment the node-id, private-key, public-key, drbg-seed, and iat-mode lines, they will be auto-generated. #node-id = 4d3e4561149907025571827a1277661b5f9fca46 #private-key = 7886017adfd178cd139e91250dddee0b2af8ab6cf93f1fe9a7a469d3a13a3067 #public-key = 4393d7641042620a60881a72ebb47ef8c5a5840acb4f858e5c0026cb2e75fd6f #drbg-seed = c23e876ddc408cc392317e017a6796a96161f76d8dd90522 #iat-mode = 0
Just ensure port 5555 or whatever is open on your firewall $ sudo iptables -A INPUT -p tcp --dport 5555 -j ACCEPT
I also setup a systemd script to start the service: $ sudoedit /etc/systemd/system/obfsproxy-server.service
[Unit] Description=obfs4proxy After=network.target [Service] WorkingDirectory=/etc/openvpn/pluggabletransportadapter ExecStart=/usr/bin/python3 /etc/openvpn/pluggabletransportadapter/standalone.py --server /etc/openvpn/pluggabletransportadapter/standalone_server_config.ini User=nobody Group=nogroup [Install] WantedBy=multi-user.target
I also like to ensure everything is running as nobody:nogroup again (or nobody:nogroup if using RHEL)
$ sudo chown -R nobody:nogroup /etc/openvpn/pluggabletransportadapter/ $ sudo systemctl daemon-reload $ sudo systemctl enable obfsproxy-server.service $ sudo systemctl start obfsproxy-server.service $ sudo systemctl status obfsproxy-server.service and make sure its running and active.
Now, off to the client side…………………..
Just like on the server side, you have to grab the obfs4proxy binary and the pluggable transport adapter scripts: $ cd /etc/openvpn $ sudo git clone https://github.com/twisteroidambassador/pluggabletransportadapter $ cd /etc/openvpn/pluggabletransportadapter/ $ wget "https://github.com/mosin/obfs4/releases/download/obfs4proxy-0.0.8-dev/obfs4proxy" $ chmod u+x /etc/openvpn/pluggabletransportadapter/obfs4proxy $ sudo chown -R nobody:nogroup /etc/openvpn/pluggabletransportadapter/
Now, we edit the client configuration $ edit standalone_client_config.ini
Comment out the two other transports: #obfs4-client2 = obfs4 #obfs3-client = obfs3
And pay special attention to the listen and server address: # listen-addr, listen-port: the address and port to listen for traffic listen-addr = 127.0.0.1 listen-port = 6666 # server-addr, server-port: the addr & port of PT server to connect to server-addr = 1.1.1.1 server-port = 5555
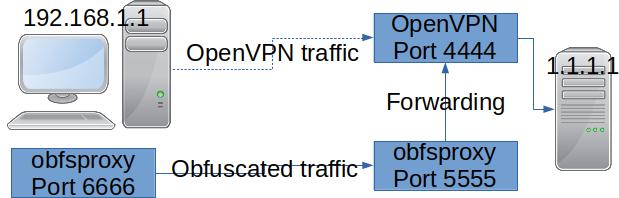
This means that obfsproxy on the client will listen on 127.0.0.1:6666 and forward the requests to the obfsproxy server listening on 1.1.1.1:5555 which in turn will forward the traffic to 1.1.1.1:4444 where the OpenVPN server is running.
We now have to update the server information we commented out in the server configuration. The information we need from the server can be obtained from running on the server: $ sudo cat /etc/openvpn/pluggabletransportadapter/state/obfs4_bridgeline.txt
which will output with:
Bridge obfs4 : cert=TT5FYRSZBwJVcYJ6EndmG1+fykZDk9dkEEJiCmCIGnLrtH74xaWECstPhY5cACbLLnX9bw iat-mode=0
Which we add to the [obfs4-client1] section of the standalone_client_config.ini file. Do not use these cert values, copy them from your state directory options-cert = TT5FYRSZBwJVcYJ6EndmG1+fykZDk9dkEEJiCmCIGnLrtH74xaWECstPhY5cACbLLnX9bw options-iat-mode = 0 Next, you need to update your OpenVPN client configuration file to connect to 127.0.0.1 and port 6666 i.e. remote 127.0.0.1 6666 instead of 1.1.1.1 4444 and you also have to overwrite the default routing. This is accomplished by running a script on route-up. I added the following two lines to my OpenVPN configuration file: script-security route-up /etc/openvpn/pluggabletransportadapter/obfs.sh down /etc/openvpn/pluggabletransportadapter/obfs.sh
and setup the script file called by the commands above: $ sudoedit /etc/openvpn/pluggabletransportadapter/obfs.sh and added: #!/bin/bash ######update these##### #dst is your server ip address dst='1.1.1.1' #default gateway: gw=$(/sbin/ip route | awk '/default/ { print $3 }') gw='192.168.1.1' #update this to your network interface iface='eth0' #################### case "$script_type" in route-up) #add default route to the openvpn server ip route add $dst via $gw dev $iface proto static metric 100 #delete the automatic openvpn route ip route del 127.0.10.1 via $gw dev $iface # change the dns server to use 9.9.9.9 and 1.0.0.1, adjust as necessary echo -e "nameserver 9.9.9.9\nnameserver 1.0.0.1"; /etc/resolv.conf # setup network manager to use these dns servers nmcli con mod home ipv4.dns "9.9.9.9 1.0.0.1" ;; down) # set dns back to systemd-resolve echo -e "nameserver 127.0.1.1" > /etc/resolv.conf # set nm back to 9.9.9.9 or whatever you want sudo nmcli con mod home ipv4.dns "9.9.9.9" ;; esac
And don’t forget to fix the permissions on the file: $ sudo chmod a+x /etc/openvpn/pluggabletransportadapter/obfs.sh
Now, I’ll try to explain what’s happening. OpenVPN tries to add the default route through the VPN’s remote IP. Since we’re using the loopback, we need to re-add the the correct one but through the obfsproxy.
Finally we setup a systemd incase you want to link it to your openvpn profile (optional) # sudoedit /etc/systemd/system/obfsproxy-client.service and put in: [Unit] Description = obfs4 After = dbus-org.freedesktop.nm-dispatcher.service NetworkManager-wait-online.service [Service] User = nobody Group = nogroup PrivateTmp = true WorkingDirectory = /etc/openvpn/pluggabletransportadapter PIDFile = /etc/openvpn/pluggabletransportadapter/obfs.pid ExecStart = /usr/bin/python3 /etc/openvpn/pluggabletransportadapter/standalone.py --client /etc/openvpn/pluggabletransportadapter/standalone_client_config.ini Restart = on-failure TimeoutStopSec=5 CPUAccounting=yes MemoryAccounting=yes MemoryHigh=5M MemoryMax=10M [Install] WantedBy = multi-user.target
Similarly, change the user to nobody, but we’re not going to automatically start it $ sudo chown -R nobody:nogroup /etc/openvpn/pluggabletransportadapter/ $ sudo systemctl daemon-reload $ sudo systemctl enable obfsproxy-client.service
Please let me know if this works for you.